Agony Tutorial 001
Agony Tutorial 002
Agony Tutorial 003
Agony Tutorial 004
Agony Tutorial 005
Agony Tutorial 006
Agony Tutorial 007
Agony Tutorial 008
Agony Tutorial 009
Some user comments about the tutorials
"These were very helpful!!! Thanks a million!"
"I enjoy working with Agony very much and tutorials were very helpful"
"I have to express my joy in finding your agony program! I am having the best time using it (first blindly and then with your tutorials) ."
"It's very very helpful, thanks! "
"Its good to know that you made the tutorials. A few days back, I was trying to work on one of your program and it just didn't work!"
Some words about animation in Agony.
The main animation form (F7) consists of:
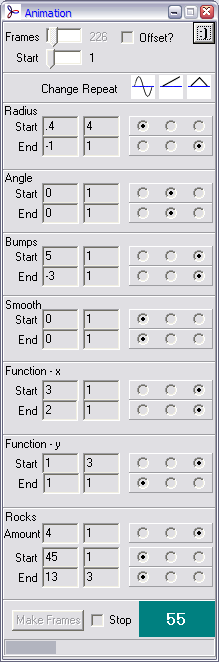
Frames: simply the number of frames to produce
Start: The frame at which to start calulating, if you want to make some frames, and then come back to it another time.
Offset: if each frame is using the "Use bezier for path/rotate" feature of Agony, then normally each frame would start at one end of this path curve, and then move along it to the destination.
Using the offset feature when producing frames for animation, each frame still draws its shapes along the same curve, but the starting point moves along that curve as time progresses (frame to frame).
What this means, is that using the offset feature alone, with no other deformations or effects during animation, you can make a normal Agony picture move along, or around (if the path is a closed loop) the path.
The slider which becomes visible if Offset is enabled, is simply the number of times you want the shape to move along the path in the entire animation.
Changing values in the animation
The following fields make changes to the start and end value of the "start" shape and "end" shape:
"Radius" - changes to the "Values" form "Start radius" and "End radius" values
"Angle" - changes to the "Values" form "Start Angle" and "End Angle" values
"Bumps" - changes to the "Values" form "Start Bumps" and "End Bumps" values
"Smooth" - changes to the "Values" form "Start smooth" and "End smooth" values
"Function x" - changes to the "Function" form "Start x" and "End x" values
"Function y" - changes to the "Function" form "Start y" and "End y" values
"Rocks Amount" - changes to the "Function" form "Rocks" value
"Rocks Start" - changes to the "Function" form "Rocks Start" value
"Rocks End" - changes to the "Function" form "Rocks End" value
Each of these fields consist of 5 columns (2 text entry boxes and a group of 3 radio buttons)
The first column is "Change", this is the amount by which you want to change the specified value (as listed in the list above).
The second column is "Repeat", this is the number of times you want to change the specified value (by the amount you chose in the "Change" column) over the course of the animation.
The three radio buttons offer you the ability to choose the way you want to affect this specified value.
You have three options.
The first is "Change as sine of progress", the value is changed by the amount you wanted multiplied by the sine of 2*pi*(frame number/total number of frames).
The second is "Change as proportion of progress", the value is changed by the amount you wanted multiplied by the frame number/total number of frames.
The third is like the second, but it will reach your desired change amount in half the time, and then return to the original value.
For example: if you want to change the Start Angle so that the start shape rotates by 360 degrees by the time it gets to the end of the frames, you would put "360" in the Change column, "1" in the Repeat column, and then select the "Change as proportion of progress" option. This way the Start Angle will increase by 360 degrees in a smooth way from the first frame to last.
Then at the bottom of the form, there is the "Make Frames" button. This will just start the batch process of frame creation. Agony displays the frame number it is currently working on, and gives a progress bar indicator.
If you want to stop the frames being produced. Select the "Stop" checkbox, if this box is selected, then Agony will stop making frames when it completes the frame it is currently working on.
Agony saves each frame after it makes it. You then have to make the actual animation file yourself from these frames using whatever tools you wish.
Agony Tutorial 001
Agony Tutorial 002
Agony Tutorial 003
Agony Tutorial 004
Agony Tutorial 005
Agony Tutorial 006
Agony Tutorial 007
Agony Tutorial 008
Agony Tutorial 009
Some user comments about the tutorials
"These were very helpful!!! Thanks a million!"
"I enjoy working with Agony very much and tutorials were very helpful"
"I have to express my joy in finding your agony program! I am having the best time using it (first blindly and then with your tutorials) ."
"It's very very helpful, thanks! "
"Its good to know that you made the tutorials. A few days back, I was trying to work on one of your program and it just didn't work!"
The end.